Connect your computer to the access point’s CPM4200_EVK
Wi-Fi network; the authentication is set to WPA2-Personal and the
security key is echelonizot.
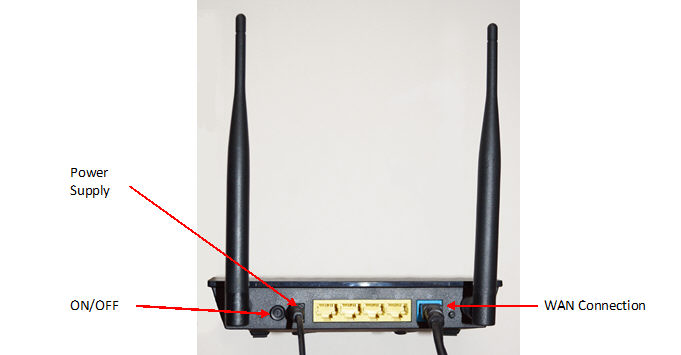
Ensure that you have an Internet connection. If not, consult
the Wi-Fi access point’s user’s guide. You can connect to the Wi-Fi
access point with a browser at the 10.5.0.1
IP address; the user name is admin,
the default password is admin.
Connect both of the Wi-Fi EVBs to your computer via the supplied
USB A to USB Micro B cable connected to the lower port of the Wi-Fi
EVB as illustrated below. The USB connection to the computer provides
power to the board, provides a debug interface and a serial console.
Windows will automatically install drivers for the USB debug
interface.
The DIO application has a block that represents a digital state
that controls a hardware digital output that controls the LED D8 and
a LonTalk/IP network output reporting the state. You can control
the digital state with a hardware switch input (SW1) and also with
a LonTalk/IP network input.
Once powered up, the Wi-Fi EVBs will connect to the access point,
automatically find each other and connect the block on one device
to the block on the other. Once connected, you can press SW1 on one
Wi-Fi EVB to control both the local LED D8 and the one on the other
Wi-Fi EVB.
Each device also has a Connect button controlled by SW2 that
you can use to add a device to the device list in the NodeUtil Device
Utility included with the IzoT CPM SDK. You can also use the Connect
button to create, modify, and delete connections.